Showing posts with label WW2. Show all posts

Sunday, February 9, 2014

Similar patterns

source image

I came across this 1943 Stitchcraft cover today. The pattern used here is very similar to the Top Honors jumper pattern. There are probably more stitches in between the slip-stitch sections, but otherwise it is the same.
Knit in the Italian (or Hungarian) tricolor it would look very cheerful for spring!

Saturday, February 1, 2014

1945 Top Honors jumper - proper pics at last!


I've realized that somehow I missed out on making proper pics of my finished Top Honors jumper (which is one of my favorites to wear right now!) So here they are! You find the project posts here.


Here is one more picture of the finished closure of the back neckline:

Friday, January 31, 2014

1945 Victory jumper - 7. the big reveal!


I'm trying to do the 'phone-pose' here with my grandma's old bakelite phone:
  

Fastest knit ever!!!
A quick recap of the past days:
31/1 Setting in the sleeves!
30/1 Finished the back of the bodice and the neck ribbing and sewed up the sleeves. Only need to set the sleeves in and weaving in the endless amount of yarn ends (did the white stripes with separate pieces of white to avoid a thick string of yarns along the edges)
29/1 Made a mistake while doing the armhole decrease, o had to rip out about 20 rows...
28/1 Finished the front armhole and neckline. Like the neckline shaping better than in my first version.
27/1 Finished the bodice up until the armholes!
25/1 Going from 90% to 30 again, with only one week left to compete the Knit to Vitctory challenge. Ripped out the patterned part of the bodice today and only left the ribbing intact. Re-started from the ribbing, planning to make the bodice wider, going towards 0 to max 1 inch of negative ease.
24/1 finished knitting the sleeves! In theory about 90% of the jumper is finished, but I'm afraid the bodice has to be re-knitted. Hours of work has to go, but now I want it to be perfect, with just a zero ease instead of a negative ease. It is hard to predict how lace patterns are going to look when finished... 20/1 sleeve I started is too wide, need to go... I'm going to restart the project tomorrow .

Monday, January 27, 2014

1945 Victory jumper - 4. rewind and repeat!


Sometimes things are not working out the way you expect. The only thing you can do is raise the bar, start over again and perform even better...


A quick recap on this project. After a month of 'silence' I pulled out my knit-for-victory project and decided to complete it by the end of january. It seemed an easy task since the bodice was almost finished. After knitting the back part from the armholes up I started with a sleeve. This is how my almost finished jumper looked like last week:


This is how it looked like 2 days ago:

So what happened? On the 23th of january the bodice was finished and I was halfway of the first sleeve. Because the sleeve seemed to be too wide I decided to rip it out and re-start with less stitches, following the original stitch count of the Victory pattern. Re-started the sleeves on the 24th of january and finished them on the 25th. The modification in the sleeves is the different way of decreasing used for the sleeve cap. The original Victory pattern starts right away with decreasing without the horizontal part which is usually formed by casting off a few stitches first. I used the decrease of my 'blueprint' pattern,  without an enlarged or lengthened sleeve-cap:
- started at the beginning of the 4th red/white stripe block
- cast off 3 sts in the beginning of the next 2 rows
- decrease 1 stitch at the beginning and end of every alternate row until 28 sts left. Cast off.

sleeve version 1
you can count more pattern repeats in the width here

sleeve version 2
I was a bit tired so decided to start the sleeve-cap decrease the next day and started with the straight part of the second sleeve next to the first one. That's why there are two sleeves on the same circular knitting needle:

the finished sleeves (not blocked yet)


After finishing the two sleeves decided to take the right step and frog the bodice. It was just to small and I knew I wouldn't like it at all. So why knit something and then not to wear?


Frogged the bodice almost completely, with only the ribbing left re-started to knit on the 25th. Instead of 13 pattern repeats I did 16 pattern repeats in the width, which will give a better fit across the bust. Thanks to a quiet nightshift I managed to knit for a few hours during the night and then sacrificed a day on knitting while watching series 3 of Homeland. I must say, it was a great relax-day with just a little of shoulder-pain at the end. Here we are now, with just 5 days left of the Knit-for-Victory challenge, there is hope I manage to finish it on time:

Monday, January 20, 2014

1945 Victory jumper - 2. on track again...or not?


Well, don't be fooled by this picture! This was the case in the morning. Now the jumper is sleeveless again... Victory became officially my jumper from hell!


The story (or should I say, saga?!) so far:
As far as construction goes instead of following the original pattern I followed my own 'blueprint' pattern, both for the stitch-count and for shaping the armholes. (Actually for the third time, as I didn't share my second jumper between the TH and Victory.) The neckline was a bit of freehand work this time, I wanted a wider ribbing than on my Top Honours jumper, but didn't want a too high neckline (like the original) so I lowered it a bit.
Somehow, I just don't know what happened, it turned out a size smaller in width than my TH jumper. Instead to grow, the lacy pattern somehow shrunk. Sounds weird, right? After blocking the results were reasonable, but I couldn't say I was in love...
Anyway, learned my lesson, but still started out the sleeve the wrong way.
Thought to be smart, I added a row of increase after the ribbing, like my blueprint pattern instructs. Instead of the expected results, the lace pattern seemed to grow this time, adding  too much ease with a blousy look, instead of the perfect fit.

Since I really want another perfect jumper decided to frog this sleeve (proudly produced past week - sigh..... and start all over again.
I must say, at this point I'm not completely sure that I'm going to leave the bodice as it is. I'd rather frog it and knit it up again than having something that's not perfect.

My plan for the next 1.5 week:
- start to re-knit the sleeves, this time using the stitch-count of the original pattern
- after finishing the sleeves sew it into the armholes, try the whole thing on and decide whether it looks good or not. (worst case scenario: frog and re-knit the bodice)
- try to finish the whole thing by the end of this month?!
- Yes, I am definitely knitting for victory!!!!

the pattern
Since I didn't share much information about the pattern yet, here is a little introduction:
'Victory' is a pattern from the collection of the English Victoria & Albert museum. Among other patterns from magazines and a couple of Bestway leaflets it is available as a free download. How about these other jumpers from the Woman's Weekly Magazine? I wish all editions of those would be available online!!! There is 'Neat and feminine' and the 'When you're off duty':


There is also 'A new design in cable stitch' or a 'Waistcoat for warmth':


My choice was the 'Victory' jumper, and as it is the 'Top Honours' it is from the war-winning year of 1945, featuring the English national colors of red, blue and white. I really like this bold, strong combination! (fun fact: these are the national colors of the Netherlands as well)


The yarn I use is again my fav.: drops baby merino in the shades 30 (dark)blue, 16 red and 02 natural:


pattern chart


The pattern envelope says it is 'such an easy pattern', because  only two rows complete the pretty scalloped stripe pattern. It is truly easy to memorize.
The stripes are formed by altering 6 rows in blue, 4 rows in red, 2 rows in white, 4 rows in red (my camera seems to fight with the bright red, but you get the idea...)

Thursday, December 12, 2013

Top Honours jumper reveal!

edit: 
I finally managed to take proper pic of my finished jumper.
You can find them HERE.
total amount of yarn used: 290g (little less than 6 skeins of drops baby merino)


Hi everyone, a really quick and short post before the upcoming busy days, of moving in our new home.
I still have to make proper pics of my finished jumper, but don't have the time to do that these days. Here are two quick snapshots of my new favorite jumper which I've already worn one time, combined with a black skirt, thighs and pumps. As you see I didn't use any vintage styling.
The fit of the jumper is just as great as I expected and the finished texture is smooth and elastic like a good quality double knit fabric would be. The drops baby merino is definitely my favorite yarn to knit with!
Coming up: more pics and the pattern modifications I made, of course.

Tuesday, December 10, 2013

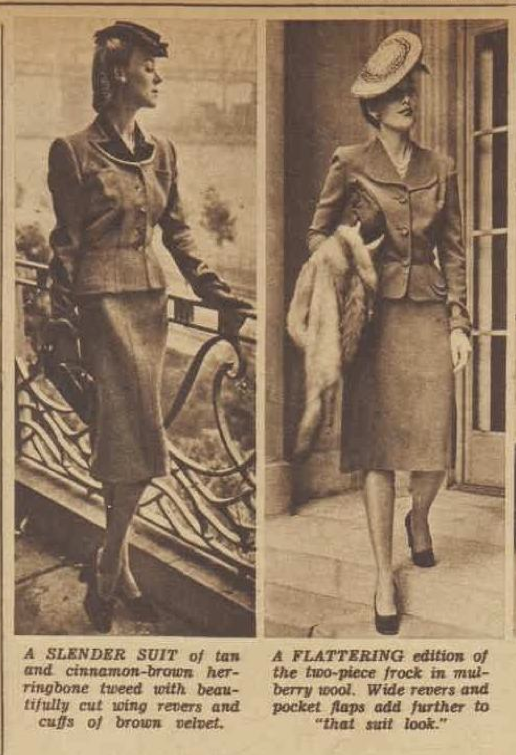
Slender silhouettes - 1944 article


How pretty are these wartime suits?!
Comparing these to the famous Dior New Look suits with the tiny waists and huge skirts, I'd say these mid-40's suits are more elegant and definitely would look much more flattering on every body type. Beautiful!
Typical details for the era are the short fitted jackets with accentuated shoulders, high neckline with different type of revers (lapels) and only 3 buttons on the jackets, slightly A-line skirts without gathering or pleating due to the wartime restriction rules (read about it more here), with complementing accessories: hats, bags and gloves.


Tuesday, December 3, 2013

Top Honours jumper: 4. Neckline tricks


Finishing the neckline is almost always the last step in the knitting process. While the neckline of the Phillipa jumper is finished with a crochet edge the Top Honours jumper has a classic rib finish. While it seems easy there are a number of tricks that makes your neckline look prettier. Because I wanted the grey color closest to my face I used that for the neck band (the waist and sleeve ribbings are blue)

1. picking up stitches
Usually the pattern instructions tell you how many stitches you need to pick up along the neckline. Then you should divide both the numbers as the neckline in even amounts, place stitchmarkers and pick up the amount of stitches  distributed evenly between your markers. So what's wrong with that? Basically nothing, but in my opinion it is almost impossible, plus time-consuming to distribute the stitches evenly.
I prefer another method, which is picking up more stitches and reducing the amount in the first round. This way you don't end up with gaping holes and you get a prettier, smoother curve. I picked up every stitch evenly and corrected the amount in the first row by knitting (or purling according to pattern) together every 4th and 5th stitch. This methoprevents a stretched-out look too.

As you can see there were quite a few stitches!

Try to keep the same distance all around, also on the diagonal sides:


To prevent a really high closing neckline I reduced the width of the ribbing.

2. casting off
It is important to cast off very loosely! (=a trial & error experience)
Even when you don't need to stretch the neckline out to pull it over your head, tightly cast off stitches can deform the shape of the finished neckline.


3. how-to: finish with a button loop
I choose a decorative button to finish the ribbed edge and used press studs for the opening (trying not to disturb the pattern). Attach the button at the inner edge of your button band underlayment. A small silver colored rose looks great on the blue- and grey tones:
   

I finished castig off the ribbing at the side where I wanted to have the button loop. The ribbing pulls a bit inwards (left pic) so I filled that up with a row of double crochet (right):
   

Secure the last stitch with a slipstitch to make a neat and straight edge:
   

Make a chain loop for your button:
   

check that your loop is not too tight and not too loose before finishing the loop:
   

Previous posts about the making of this jumper: 
1. introduction 
2. pattern chart and pattern diagram 
3. sleeve caps + my modification: back neck opening