Showing posts with label sewaholic pattern. Show all posts

Sunday, May 19, 2013

Actually sewing!!! (Alma blouse part 1/2)


At last, I decided to sew something!
As I wanted some 'instant satisfaction' I went for a cheap project, with no muslin! I choose the Sewaholic Alma blouse which has intrigued me for a long time. This time, since the fabric was for free, I didn't want to spend time with making a muslin. In the past made several Sewaholic dresses and the fit was always right. For a casual fit I choose to make size 8 bust and tapered it to size 6 at the waist and hips. Just like I vid with my Lonsdale dress.

I've bought the supplies above: green thread, a red zipper, green bias band and two pretty gold-and-green buttons and used a christmas-y colored table cloth which I've had for about 10 years but have never used:


The fabric is 55% cotton and 45% rayon and feels light and soft. Washed and ironed it hot and unpicked the seams. The size was 1.4x1.4 m. Not bad at all! Unfortunately, it was still just too little to make the long sleeved version which requires 1.9 m. Matching the plaid makes it impossible to use every inch of the fabric well. I have a plaid blouse with roll-up tabs on the sleeves which I like, so I decided to make a 'fake' long sleeved version, by eliminating the cuffs but keeping the full length of the sleeves.


I've cut single layers as usual.
I am missing part of my sewing stuff, so I must do it without my pins (again). I just used ordinary sewing needles since I do have 2 boxes of those on hand.
I didn't feel like making the facings for the neckline so I used the green bias tape to finish the neckline.

1. Achieve the perfect shape by stretching and steaming the bias tape in a curved line:


2. Pin or baste bias tape to neckline (right side to right side):


3. Stitch en trim seam allowance, then clip:


4. Finish lower edge of bias tape, and here is what it looks like on the inside:


5. For  a perfect row of top stitching I used my sewing machine's top stitch guide foot (also called a 'stitch-n-ditch' foot) with the needle placed to the left. Easy!
   
to be continued...

Friday, June 22, 2012

Sewing plans - coordinates

   
Simplicity 3688 and 4044

Love or hate coordinates?
First of all the most beautiful, shooting music to wake up with... at least to whom who love classic music. Others might find this rather irritating because of the repeating theme of the Canto Ostinato from Simenon ten Holt. (the title means 'stubborn song')

Anyway, there is a new Sewaholic pattern!
I wasn't testing this time as I did with the Cambie dress, Tasia asked specially for pear-shaped ladies for pattern testing and I'm not one. Though, my weakest point (hello body image!) are my thighs. Trousers often stuck halfway up, even if they would fit in the waist. and how about the gaping backs? Pffff..... Now, the new pattern, the Thurlow trousers look like have enough room in the leg-area: "It’s the first trouser pattern designed for curvy hips, fuller thighs and a narrow waist." There is also a built-in extension in the back which you could adjust. Once we are settled in our new home I'm planning to make a suit, skirt and trousers to have a complete coordinated set, like the Vogue Wardrobe series.

To make my wardrobe-variation, I need to a fitted jacket. The jackets of the patterns above are not fittd enough for my taste. They are early 40's patterns, a bit boxy and long, while towards the end of the 40's the jackets got more fitted and a little shorter too. For the skirt and the suit I'm going to use the out of print Vintage Vogue pattern 2885 which I've recently ordered. The jacket is really nicely fitted and the skirt is an A-line, even if it looks on the pattern envelop like a fitted, straight one. For the trousers I'm planning to use the Sewaholic Thurlow pattern, which has wide legs, a slightly lower waist than the traditional 40's pants. I think it would go nicely with the 40's Vogue jacket:


Played with Photoshop a little to show how the fitted suit would look on my not-so-elongated torso. Just to show how different the proportions are. Still looks good...

Friday, May 25, 2012

My Cambie dress featured on Sewaholic


My dress is featured on one of my favorite websites, Tasia's Sewaholic!
Unfortunately I didn't do much sewing lately, because a huge house-painting project. All the fabrics were folded up and patiently waiting in boxes...
In the meantime the summer has arrived here, in the Netherlands and I have plenty opportunities to wear my Cambie dress now!

Thursday, May 10, 2012

Pattern testing: Sewaholic Cambie dress muslin


Size 8 muslin (left) and size 6 dress (right)

As I mentioned I was a pattern tester for this dress. The Cambie dress has a sweetheart neckline with gathered cap sleeves and a full of A-line skirt. I love dresses and my favorite part of the design are the sleeves with a 'sleeveless' look. If you look at the picture of the back you can see why isn't it sliding off the shoulders. A clever solution. I believe this is another pattern that looks good on everyone, with every type of body shape.

As always I started by making a muslin. Since the skirt has two versions and I always choose the A-line skirts I decided to invest some extra muslin fabric and sew up the complete dress with the gathered skirt. I made size 8 since that is my Sewaholic size, though I used size 8 bust and size 6 waist measurements for my Lonsdale dress. As you can see the top turned out too big, but I instantly loved how the dress looked like! I felt like a little girl in a swirly skirt and spent the rest of the evening (pinned up) in my dress...while making a size 6 muslin for the top with the waistband to try out the fit. (It is visible that I used facings for the neckline of my muslin instead of a double layer)

I thought the gathered skirt would make me look bulky around the waist and hip, but it actually looks much better than I thought. I like it!
I simply went down one size and size 6 was a perfect match. I usually have to shorten the bodices but this one fits right out of the envelop. The length was just right, I used my blind hem foot for the eyelet fabric, for me the skirt shouldn't be shorter than this. As fort the fabric I wanted to try a swiss dot but wasn't be able to get it here in the Netherlands. Somehow this type of fabric just doesn't exist? The I've found this pretty eyelet with the big circles and now I feel sorry for buying just enough for this dress. I feel like I want to make at least 10 summer dresses out of eyelet fabric!


The dress wasn't hemmed here and I just pinned up the back. Isn't it pretty?

Friday, May 4, 2012

Sewaholic Cambie dress

Have you seen the new Sewaholic pattern?Remember my eyelet fabric? Well, I was a pattern tester for this dress and the results are great!

Sunday, March 18, 2012

Cavalli goes Renfrew - finished


I made a start with refashioning a Cavalli man's shirt. Due to a problem with my old sewing machine I had to stop but now finished it with my new sewing machine! The Renfrew top pattern is a quick and easy one.
I used the nr. 10 stitch + a small zigzag to secure the edges:


Matching the seams is easy with the walking foot, the layers stay perfectly together (seam allowance here already trimmed):


The length is slightly shorter than the original of the pattern. Since the fit around the waist is great I just took out 3/4'' from the bottom before attaching the waist band:


Sunday, March 4, 2012

Cavalli goes Renfrew! - part 1


Even if I can't work on this project right now I'd like to show how far I am in the process of refashioning an original Cavalli shirt!
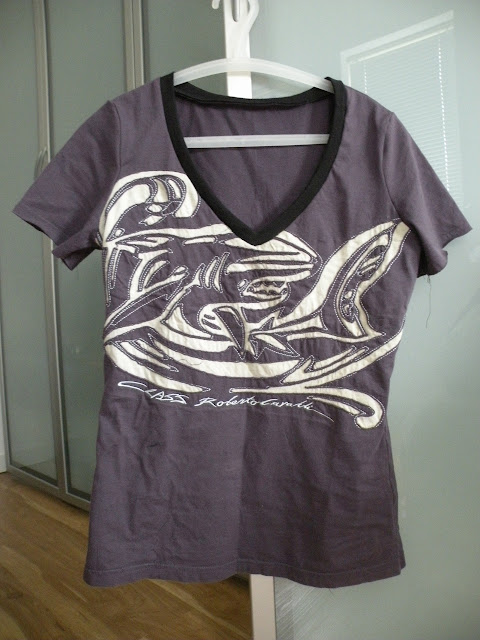
My boyfriend had about 7-8 years ago a period of buying really expensive clothes. Well, if you wonder we didn't know each other by that time.  As he were a bit older and gained a bit weight he didn't fit those pretty shirts anymore. These two with the cutout motives were just too pretty to throw or give away and I kept them for years and years in the closet:


Now, after sewing up the Renfrew muslin I thought the Cavalli shirts were ready for a makeover!I satred out with the purple one. Since the shirt shrunk a bit it was already closer to my size than to the former L of my boyfriend. Let's say they aren't bigger than a women's size medium.

This means there wasn't much fabric to work with. First I carefully took the shirt apart. This was a lot of work!

The front, back pieces and the sleeves fitted just right but then all of the available fabric was used. It would be nearly impossible to find the same color fabric so I decided to introduce another color. I took a basic black shirt to supply the sleeve and neckline bands. Decided to keep the original seam at the bottom of the shirt for now, I'm going to decide about the waist band after assembling.
   

I decided to cut in the motifs at the front and the sides:


Used the good old zigzag stitch everywhere, at the end two rows next to each other.
 

I reinforced the shoulder seam with satin bias band, cut in half lengthwise and folding the sides under:
 

Here is visible that the stitches aren't perfect, this was the moment that I decided the sewing machine needed some reparation again (though I'm really satisfied with the overall look!)

Sunday, February 26, 2012

Renfrew top muslin


Well, all the plans for the weekend has changed. Instead continuing working on my Marfy dress I made anther muslin. I ordered the new Sewaholic pattern, the Renfrew top a couple of days ago and it arrived on friday!

The Renfrew top is a fitted knit top with banded hems and variations for the sleeves and neckline. I've seen a lot of pics around on sewing blogs and thought the fit was great. Also I love wearing V-neck tops with 3/4 sleeves and somehow, there aren't many out there to buy. This was the second pattern I ordered from Sewaholic Canada (there are no resellers in the Netherlands). Ordering the pattern was easy, and the delivery quick.

Of course I had to start with the construction of a muslin!
Since I haven't sewn knits for a long time I did not have knit fabrics in the house. But I did have a giant pile of crew shirts from my friend. I used an old, man's x-large sized crew-shirt which has been worn and washed for years and years. I thought long enough to make it a bit sturdy to qualify as a 'stable knit'. Since I don't have a serger I can't sew with really stretchy knits anyway.


Sizing is always tricky, so I pulled out my other Sewaholic pattern, the Lonsdale dress. I used size 8 for the bust tapering to size 6 in the waist and hips on that dress. I used the finished garment measurements and compared to the Renfew top finished measurements. Decided to go with size 8 at the top part (shoulders and bust) and tapered to size 4 at the waist and hips.

The V-neck neckband was a bit tricky, an interesting construction. It didn't turned out perfect, but will get better next time around.  I followed the instructions and used zigzag stitch around the neckline to secure the seam allowance and I think it looks good. (When I was young my grandma used to make almost all our clothes and she used to sew knits with zigzag stitches too.) Next time I might try to use a double needle, that way there would be two straight stitching lines instead a zigzag.

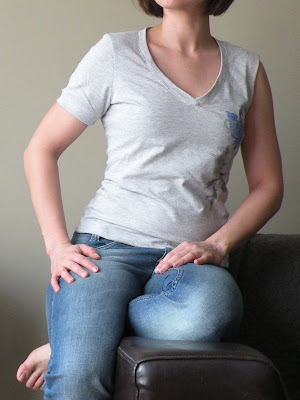
I think the results are not bad! I didn't have enough fabric to make the waistband, so I just folded the seam allowance back and stitched with a zigzag stitch. It is just a muslin, but surprisingly, the length of the top turned out just right! With a waistband would be a bit longer, but also perfect.
(I never wear my shirts tucked in) There is enough room under the arms, the top feels roomy enough but still nicely fitted.