Friday, May 31, 2013

House update: Hallway finished


The hallway is finished!
The 50's style tile walls are finished, including sanding and painting the walls in the hallway. I already wrote about it:
In the 50's when our house was built it was common to put tiles on the walls in the hallway. One of our neighbors have a few meters of the original hallway-tiles: light blue with a row of black square tiles at the bottom. Since blue is not my color when it comes to interiors we decided to use the same size tiles as the original in a greyish-cream color that goes well with the other colors in the house. We 'reproduced' the row of black square tiles as well. Pretty!


Here is what the finished tiles and painted walls looks like:

Thursday, May 30, 2013

Contribution to 'Help a kitten with a knitten'


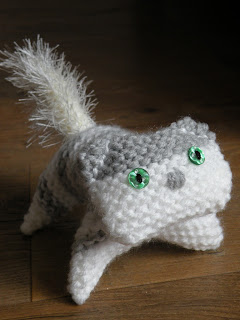
Of course, past week I have been busy with another in-between-project, for animal protection this time. The shelters are full again. The animal protection in the Netherlands started a project 'Help a kitten with a knitten'. They ask you to knit kittens which they are going to sell. The money goes to the shelters to save more abandoned kittens which gets sterilized, vaccinated and placed.
On their website they provide the pattern. Of course, since I was already knitting and love cats, I felt I had to participate! I didn't have much wool so I bought some and started a knitting marathon to produce 10 knittens! They are all grey, white and black and have pretty green button-eyes. The filling came from an old IKEA pillow. The total costs for the wool, buttons were 10 euro's for me, but I don't mind and see it as my contribution.


The little family:


Here are all of my 'knittens':

Thursday, May 23, 2013

An in-between-project: emerald green knitted hat


I've been dreaming for years of knitting shawls, hats and other stuff in advance of the winter months. At the end of the day I never did. Last winter lasted so long and I really missed a hat to keep my ears warm. Last week I saw this emerald green yarn and decided it was time to actually knit a hat for myself. It's acrylic and this beanie-type, slouchy hat was my inspiration:


did you know... ...that there is a difference between the 'English knitting' and 'continental knitting' method? The main difference between the two methods is that with English knitting you hold the yarn in your right hand and "throw" it over the needle, while with continental knitting you hold the yarn in your left hand and "pick" it as you form stitches. While western Europe uses the English method I've learned from my grandma the 'continental method' which seems to be much faster i.m.o. More explanation of both methods with pictures here.

I used smaller needles than recommended but I like the neat and compact look and my hat definitely had to be warm as well for the winter to wear it when biking to work.

I always use circular needles, even for square pieces, when knitting forward row followed by a backward row because this way I don't have to hold the weight of the knitted pieces on my needles. Another advance is when making a circular piece like a hat that you only work on one side (the right side) of the garment round and round. Making only knit stitches speeds up things a lot!


After seeing it on Tasia's green hat here. I've got the idea of making a double brim. Warm ears are important in the winter!
To make the brim as elastic as possible I used a 2x2 rib by altering 2 knit stitches and 2 purl stitches) this is one of the strongest and most elastic structures for a brim i.m.o. After reaching the desired length (for me it was 14 cm) I folded the brim double and knitted the edge with the stitches of next row together. This could have be much easier by using a crochet needle. (Unfortunately, all of my crochet needles are packed up somewhere, among other stuff...) By joining the two parts together like this the elasticity of the brim remains intact and there are no visible sewing stitches either:


This is what the joined brim looks like from above (before knitting the part above the brim)


And as you can see there are no visible stitching lines when continuing:


Even Mr X tried it on and approved it, although usually he refuses to wear any 'home-made' stuff by me:


Here is the top part, just knit stitches all around. For more thickness and structure I used a simple rib for the main part:

for circular knitting!
1st row: *yarn over (from front to back), slip one knitwise, knit stitch*
2nd row: *knit stitch, knit two together*

if you don't use circular needles the 2nd row will be knitted on the reverse side  which means using purl stitches instead of knit stitches!
2nd row: *purl two together, purl stitch*

I finished the upper part with straight stitches only, as I liked that on my 'inspiration' hat. The top is just pulled together after quickly decreasing the amount of stitches by knitting two together in 2 rows:


Sunday, May 19, 2013

Actually sewing!!! (Alma blouse part 1/2)


At last, I decided to sew something!
As I wanted some 'instant satisfaction' I went for a cheap project, with no muslin! I choose the Sewaholic Alma blouse which has intrigued me for a long time. This time, since the fabric was for free, I didn't want to spend time with making a muslin. In the past made several Sewaholic dresses and the fit was always right. For a casual fit I choose to make size 8 bust and tapered it to size 6 at the waist and hips. Just like I vid with my Lonsdale dress.

I've bought the supplies above: green thread, a red zipper, green bias band and two pretty gold-and-green buttons and used a christmas-y colored table cloth which I've had for about 10 years but have never used:


The fabric is 55% cotton and 45% rayon and feels light and soft. Washed and ironed it hot and unpicked the seams. The size was 1.4x1.4 m. Not bad at all! Unfortunately, it was still just too little to make the long sleeved version which requires 1.9 m. Matching the plaid makes it impossible to use every inch of the fabric well. I have a plaid blouse with roll-up tabs on the sleeves which I like, so I decided to make a 'fake' long sleeved version, by eliminating the cuffs but keeping the full length of the sleeves.


I've cut single layers as usual.
I am missing part of my sewing stuff, so I must do it without my pins (again). I just used ordinary sewing needles since I do have 2 boxes of those on hand.
I didn't feel like making the facings for the neckline so I used the green bias tape to finish the neckline.

1. Achieve the perfect shape by stretching and steaming the bias tape in a curved line:


2. Pin or baste bias tape to neckline (right side to right side):


3. Stitch en trim seam allowance, then clip:


4. Finish lower edge of bias tape, and here is what it looks like on the inside:


5. For  a perfect row of top stitching I used my sewing machine's top stitch guide foot (also called a 'stitch-n-ditch' foot) with the needle placed to the left. Easy!
   
to be continued...

Monday, May 13, 2013

House - approaching the deadline!


We are approaching our deadline (1st of june 2013) for finishing the house and moving in. Made a lot of progress with one important + big task left: the bathroom. We are kind of avoiding to start on that and finish everything else first. Honestly, I think we are just afraid to mess it up... Really don't want to take tiles off again or solve all kinds of practical problems on the spot (walls that aren't straight and stuff like that)

In the meantime we managed to finish the dining room area. By breaking down a wall we created a light an spacious room and we are really pleased with how it came out! Ultimately we are going to break out the window and install french doors somewhere during the next few years. The door on the left isn't insulated at all so that needs to be changed as well:


Here is the current (almost finished) project: walltiles in the hallway. In the 50's when our house was built it was common to put tiles on the walls in the hallway. One of our neighbors have a few meters of the original hallway-tiles: light blue with a row of black square tiles at the bottom. Since blue is not my colors when it comes to interiors we decided to use the same size tiles as the original in a greyish-cream color that goes well with the other colors in the house. We 'reproduced' the row of black square tiles as well. Pretty!


There are a couple of things that originally came with the house in the 50's and we wanted to 'recycle':

The brass edge for the doormat:


The bakelite free/occupied sign for the downstairs toilet:


The 'ding-dong' doorbell (ugly plastic and quite big, but has the perfect spot there and has a beautiful, old fashioned sound)


One of the old kitchen cabinets found in the garage (I'm going to clean this one and leave the paintwork as it is. After repairing the doors we place it somewhere in the living or dining room)


After starting with cleaning the stairs we quite like the original bluish-grey color. We consider to leave the stairs after removing all the carpet glue as they are - didn't decided on this one yet:


Outside there is one little corner kind of 'ready': where I've put a climbing jasmine plant (found elsewhere in the garden) and moved my pretty double-flowered hortensia from the other house (after a rigorous trimming session).

The front garden is still empty, but we planted two more rows of the beech hedging to frame it around (the brown bits on the right are the new ones, they have leaves now) I like the beech hedging because the leaves are retained in a dry state throughout the winter.