Monday, February 13, 2012

Marfy dress - sleeve variation


The longer I looked at the pictures the more I thought there is something wrong... Guess what, it turned out it was the sleeve. Somehow, there is just too much of volume there, it draws all attention away from the pretty details of the bodice and the skirt:
  

I figured, I had to take out some of the volume to make it look better.
Here are the before and after pictures (going from the 1980's to the 1940's!):
   

How I did it?
It is a quite simple change. I didn't even removed the sleeve.
First of all, the type of sleeve I wanted is the classic 1940's type puffed but short, straight sleeve. I took out the Colette Ceylon dress pattern. It is another contemporary but definitely vintage style pattern. The sleeves are gathered at the shoulders but further plain. Exactly what I wanted for this dress too:


Comparing the patterns the sleeves they have a different sleeve cap, so I left that as it was.
I was interested in lower end of the sleeve. The Marfy pattern is made for a classic gathered sleeve, it widens towards the cuff. The Ceylon dress pattern is more fitted, narrower at the bottom.

1. I folded the wider bottom parts inwards, parallel with the side lines of the Colette pattern:


2. As you can see the bottom curve is just the opposite (inwards on the Ceylon pattern) so I took that over too. That's it!
I might make the sleeves slightly longer (an inch or so =2,5 cm) falling just above the elbow.
With this little modification my muslin is just perfect and the pattern pieces are adjusted too. Just have to find the right fabric to sew up this dress! My first idea was to use cotton fabric but I realized that it would look much better in a fabric with a better drape.

Sunday, February 12, 2012

Grey inspiration


Calvin Klein pre-fall 2012 show. Love the colors and the silhouettes!

Thursday, February 9, 2012

Creating a cloche pattern - part 2.


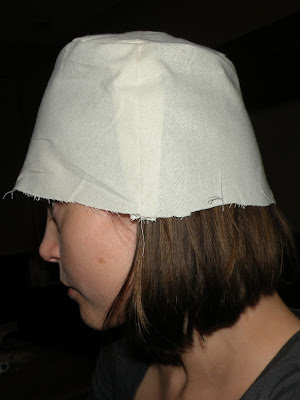
Part two of my cloche pattern design-cahallenge. My own 1920's cloche is ready!
Scroll down for more pics (side view)
I consider this fleece hat as a wearable muslin. I'm going to wear tomorrow when I bike to work early in the morning! The top of my hat is a single layer but the side and the brim are double layered for more warmth and strength. The fleece comes from the IKEA. It is a 3 Euro fleece blanket:


What I did after fitting my first muslin:
- marked all the seam-lines with pencil
- took the muslin apart 
- traced all the pieces 
- added seam-allowances
- decided to make another muslin out of fleece, which I also could wear as a winter hat.

Since fleece seams can't be pressed I topstitched on both sides of the seams:


Several layers of fleece would be too thick to sew so I've cut the corners and at the places with more than two layers I've cut away 1/2 of the seam allowance on the third layer:


And here it is! The transformed blanket.
I quickly tied a grey ribbon around above the brim to get an idea of how it would look with 20's style embellishments. I could imagine this hat made out of velvet or very short haired faux fur.
(It was already evening when I made the pictures that's why they are a bit blurry)


Tuesday, February 7, 2012

Bienvenue lecteurs Français!


'Just skirts and dresses' is mentioned in a selections of European sewing blogs on the French 'Thread and Needles' site!  Bienvenue lecteurs Français!

Monday, February 6, 2012

Creating a cloche pattern - part 1.


Let's start with a statement:
It is pure for my own pleasure that I attempt to make my own patterns. I don't use any existing pattern to do this, gather only visual inspiration from the internet. I am not a pattern maker and I'm not intended to sell any of my patterns and earn money that way!

Well, here is my current obsession, the 1920's cloche hat.
Cloche inspiration: There are lots of beautiful cloche pictures on the internet. There are two sorts of hats called a cloche: the one with the close-fitting round crown with mostly no brim and the more cylindric 'brimmed felt' type cloche (like in the illustration below). Both are reminiscent for the 1920's. For a nice collection of fashion drawings  click here.

What I like is the close-to-the-face shape of these hats and the embellishments. You didn't show your forehead in the twenties! The height of the hat was supposed to add height to the wearer's length too. Cloches were perfect to wear with the new hairstyle, the bob haircut. The brooch type embellishments like flowers or abstract, often art-deco-like shapes were made of fabric are used to cover up seam-lines. For myself because of my round face I'd choose the cylindric cloche instead of the round (helmet-like) one.


If you want to get in the mood, just look at these gorgeous creations!!! Pretty, handmade, almost art I would say. Since I don't work with felt I must take a look at cloches that are sewn. My inspiration are these, because these hats have a pretty cloche-shape and are sewn from unshaped woven fabrics.
I took one hat for further analyze: this one, because of the plain color and pretty shape. The structure is consisting of 3 parts: top, side, brim just like my winter hat.

Now, what are the (visible) differences in the structure?
Top: 
It is made up out of four triangles, but while my top is rather flat this one is more curved. This means I have to make my triangles bigger and more umbrella shaped. Also while my triangles match the seam-lines these are turned so they form an X rather than a + on top.
Side: 
I think the sides are quite similar, so no big changes to that for now. As I see it has only one seam-line, at the back.
Brim: 
The brim has the same width at the front and the sides and gets smaller towards the back. Again, just one seam-line at the back.

This was my first try: Too small, I added some extra fabric at the outer edges. This was quite easy.
It was harder to make the sides. I went with a two part design. I experimented with the shapes and ended with a slightly curved upper and lower part:


The top is visible here:


Number one attempt. It looked like some kind of rain-hat or fisherman hat. Hmmm...
  

Below is the 4th version with a wider top. (I haven photographed all the wasted, too small-too big versions, but let me tell you it took a lot of time to try on and adjust everything)
Here I thought the fit was right!  I only needed to shorten the sides:
 

On the first picture in the second row is clear that the new top is much wider than the first one (on the left):


And here is my finished design! Please ignore the notations written all over. I quickly made some embellishments just to make it look 'real':


There is still a lot left to do:
- mark all the seam-lines 
- take the muslin apart 
- trace all the pieces 
- add seam-allowances
- make another muslin from a thicker and sturdier fabric 
- check the fit again
To be continued!

Saturday, February 4, 2012

1920's fashion


Recently I've got this EvaDress pattern and I must admit I love the 20's style! Probably my second favorite fashion era after to the 40's! Look at the elegant, pretty dress and coat below:


 Loooove those cloche hats!
 
Angelina Jolie in the movie 'Changeling'


And this is my hat, bought in London. Banana Republic 'Patricia' hat. How about these beauties?

Thursday, February 2, 2012

Marfy patterns dress - muslin 2.


Here are the pictures of my perfected muslin. Looks very 1940's, doesn't it? And it looks exactly like the model drawing! The bodice is not super fitted, although this is not really clear when looking at the drawing.
For the pictures I've put on a small belt. So it is visible that the horizontal line between the bodice and the skirt part sits perfect on the waistline.
Here are the adjustments:

- Stitched down the pleats. The pleats look like the model drawing:


- Widened the upper part of the cuffs by 1 cm. The sleeve falls much better now:


- As for the back, I started with a swayback- adjustment.
There are different methods for this, I did the following:
Took out a horizontal piece, which I folded. This shortens the midline in the back and is tapered to nothing at the sides. The fit is better now. It is not totally fitted, since I want to wear the dress with a belt, so I need a bit of extra ease. You can observe a few vertical lines towards the sides, this is a sign that I have to take out a bit less fabric towards the sides:


And here is a before (left) after (right) comparison:
  

Now I need to transfer the changes to the paper pattern pieces. One thing that I need to do is to add the same amount of fabric at the bottom of the skirt as the amount I took out in the middle of the skirt back. On the right picture above is clear that the side seam moves towards the back! This needs to be corrected too.