Showing posts with label hat. Show all posts

Thursday, June 27, 2013

Trinity/Blackberry stitch hat finished!


Here is the finished hat. It was a quick project, a little less than 100g yarn went into it. I knitted it on metric size 3 needles (=US 2 and =old UK11)
I did the decreasing freehand, because the pattern is quite forgiving. As long as you keep making the dots (P3TOG) and decrease (2TOG) in the uneven rows. Here is a picture of how I do it on my circular needles:


And the finished hat (the 'real' color is a rich aubergine hue).


Here is my experimental picot-edge:


The knitted on double brim:

Tuesday, June 25, 2013

On my needles - Trinity/Blackberry stitch hat


Yes, there is another hat in the make...
I've found this 80%acrylic/20% wool yarn and wanted to test with a smaller piece how it 'behaves' when wearing and washing. If it all goes well I might try to make a sweater!

By the way, this is the only picture which represents the real color, the other pics turned out kinda greyish:


I started with my trusty doubled brim as always, but this time I made picot-edge which looks pretty:


The pattern is the 'Blueberry'  or 'Trinity'  stitch which I've spotted on one of Miss Lemon's sweaters too. It is really easy to make and still looks special:/>Blackberry or Trinity pattern
Row 1. *P*
Row 2. *P3TOG, K1-P1-K1 in the next stitch*
Row 3. *P*
Row 4. *K1-P1-K1 in one stitch, P3TOG*
Repeat rows 1 to 4
When working on circle needles you only work on the wrong side of the pattern: rows 1 an 3 are: *K* (Rows 2 and 4 remain the same!)

Tips:
- On my sample this stitch took up a little bit extra in the width compared to plain stockinette. To avoid a 'shrunken' look like above, I used a smaller size needle on the brim and changed to bigger when starting the pattern.

This is the wrong side patternwise, but the side I'm working on:


- After making a mistake in counting which made a row of bobbles shift I started to use a stitch marker (a plain safety needle was on hand) to mark the last stitch of every row. Well these things happen when you are trying to knit a pattern with a practically invisible dark thread in the evening while watching TV... (Anyway, I left it as it is, since I don't think it will be disturbing in the finished item)


- An easy trick to determine whether you have to continue with an even or uneven row: After you finish an even row the stitches are divided in groups':


After you finish an uneven row your stitches are evenly distributed on your needle:

Monday, June 10, 2013

Quick thick yarn hat & cowl


Seed stitch:
*1K, 1P* in next row K on P and P on K (for circle needles)


Hat:
A little less than 100 g yarn
Gauge: 12 stitches and 14 rows=10 cmx10 cm
Cast 52 stitches
1st row: K
2 - 12 row: seed stitch
from row 13 next 10 cm stockinette
decrease: Row 1: *11K, K2TOG* (48 st remain)
Row 2: K
Row 3: *4K, K2TOG* (40 st remain)
Row 4: K
Row 5: *3K, K2TOG* (32 st remain)
Row 6: K
Row 7: *2K, K2TOG* (24 st remain)
Row 8: K
Row 9: *1K, K2TOG* (16 st remain)
Row 10: K
Row 11: *K2TOG*
Pull thread through remaining stitches and finish


Cowl: 
A little more than 200 g yarn
Cast 74 stitches and  knit round with a circle needle in Seed stitch

Edit:I used Pingouin 80% acrylic and 20% wool yarn from a cheap store 'Euroland'. Paid 10 euro's for 6x50 g.

Wednesday, June 5, 2013

Grey knitted hat an basket weave cowl finished!


The grey hat and the cowl I started here are finished. A little less than 300g yarn went into it (used 2 for the cowl and 1 for the hat)
Costs: about 6 euro's. I thought about making the top of the hat flat, but I like the slightly gathered look. Though I decreased the stitches over 16 rows to avoid bulking.

Peek at the back of the basket weave pattern:


The cowl is knitted in the width. After finishing and casting off I joined the seams with a stitch that looks like a knit stitch:

click on picture for source and written instructions!


This is how the finished seamline looks:


Sunday, June 2, 2013

On my needles - knitted hat and a basket weave cowl


Since I was knitting I started another hat-shawl project.
The hat has the same doubled brim as the emerald green one . It took a little less than a 100 g yarn (74 % acrylic with 20% wool and 6% viscose) and it costed just 2 euro's.


From the same yarn I'm going to make a wide shawl/cowl that I can wrap twice around my neck. Since the hat is made with simple and quick stockinette knit I choose a decorative '3-dimensional' pattern for the shawl. There are different versions of this 'basket weave pattern'. The blocks of mine are basically formed by altering 4 rows of 3 knit stitches and 4 rows of 3 purl stitches, with a vertical row of purl stitches between the little squares:


Basket weave pattern:
Cast on an amount of stitches that is a multiple of 8 plus 1 extra 

Row 1: *5P, 3K* finish row with 1P
Row 2: start row with 1K *3P, 5K*
Row 3: same as row 1
Row 4: same as row 2
Row 5: start row with 1P *3K, 5P*
Row 6: *5K, 3P* finish with 1K
Row 7: same as row 5
Row 8: same as row 6
Repeat row 1 to 8

Thursday, May 23, 2013

An in-between-project: emerald green knitted hat


I've been dreaming for years of knitting shawls, hats and other stuff in advance of the winter months. At the end of the day I never did. Last winter lasted so long and I really missed a hat to keep my ears warm. Last week I saw this emerald green yarn and decided it was time to actually knit a hat for myself. It's acrylic and this beanie-type, slouchy hat was my inspiration:


did you know... ...that there is a difference between the 'English knitting' and 'continental knitting' method? The main difference between the two methods is that with English knitting you hold the yarn in your right hand and "throw" it over the needle, while with continental knitting you hold the yarn in your left hand and "pick" it as you form stitches. While western Europe uses the English method I've learned from my grandma the 'continental method' which seems to be much faster i.m.o. More explanation of both methods with pictures here.

I used smaller needles than recommended but I like the neat and compact look and my hat definitely had to be warm as well for the winter to wear it when biking to work.

I always use circular needles, even for square pieces, when knitting forward row followed by a backward row because this way I don't have to hold the weight of the knitted pieces on my needles. Another advance is when making a circular piece like a hat that you only work on one side (the right side) of the garment round and round. Making only knit stitches speeds up things a lot!


After seeing it on Tasia's green hat here. I've got the idea of making a double brim. Warm ears are important in the winter!
To make the brim as elastic as possible I used a 2x2 rib by altering 2 knit stitches and 2 purl stitches) this is one of the strongest and most elastic structures for a brim i.m.o. After reaching the desired length (for me it was 14 cm) I folded the brim double and knitted the edge with the stitches of next row together. This could have be much easier by using a crochet needle. (Unfortunately, all of my crochet needles are packed up somewhere, among other stuff...) By joining the two parts together like this the elasticity of the brim remains intact and there are no visible sewing stitches either:


This is what the joined brim looks like from above (before knitting the part above the brim)


And as you can see there are no visible stitching lines when continuing:


Even Mr X tried it on and approved it, although usually he refuses to wear any 'home-made' stuff by me:


Here is the top part, just knit stitches all around. For more thickness and structure I used a simple rib for the main part:

for circular knitting!
1st row: *yarn over (from front to back), slip one knitwise, knit stitch*
2nd row: *knit stitch, knit two together*

if you don't use circular needles the 2nd row will be knitted on the reverse side  which means using purl stitches instead of knit stitches!
2nd row: *purl two together, purl stitch*

I finished the upper part with straight stitches only, as I liked that on my 'inspiration' hat. The top is just pulled together after quickly decreasing the amount of stitches by knitting two together in 2 rows:


Thursday, February 9, 2012

Creating a cloche pattern - part 2.


Part two of my cloche pattern design-cahallenge. My own 1920's cloche is ready!
Scroll down for more pics (side view)
I consider this fleece hat as a wearable muslin. I'm going to wear tomorrow when I bike to work early in the morning! The top of my hat is a single layer but the side and the brim are double layered for more warmth and strength. The fleece comes from the IKEA. It is a 3 Euro fleece blanket:


What I did after fitting my first muslin:
- marked all the seam-lines with pencil
- took the muslin apart 
- traced all the pieces 
- added seam-allowances
- decided to make another muslin out of fleece, which I also could wear as a winter hat.

Since fleece seams can't be pressed I topstitched on both sides of the seams:


Several layers of fleece would be too thick to sew so I've cut the corners and at the places with more than two layers I've cut away 1/2 of the seam allowance on the third layer:


And here it is! The transformed blanket.
I quickly tied a grey ribbon around above the brim to get an idea of how it would look with 20's style embellishments. I could imagine this hat made out of velvet or very short haired faux fur.
(It was already evening when I made the pictures that's why they are a bit blurry)


Monday, February 6, 2012

Creating a cloche pattern - part 1.


Let's start with a statement:
It is pure for my own pleasure that I attempt to make my own patterns. I don't use any existing pattern to do this, gather only visual inspiration from the internet. I am not a pattern maker and I'm not intended to sell any of my patterns and earn money that way!

Well, here is my current obsession, the 1920's cloche hat.
Cloche inspiration: There are lots of beautiful cloche pictures on the internet. There are two sorts of hats called a cloche: the one with the close-fitting round crown with mostly no brim and the more cylindric 'brimmed felt' type cloche (like in the illustration below). Both are reminiscent for the 1920's. For a nice collection of fashion drawings  click here.

What I like is the close-to-the-face shape of these hats and the embellishments. You didn't show your forehead in the twenties! The height of the hat was supposed to add height to the wearer's length too. Cloches were perfect to wear with the new hairstyle, the bob haircut. The brooch type embellishments like flowers or abstract, often art-deco-like shapes were made of fabric are used to cover up seam-lines. For myself because of my round face I'd choose the cylindric cloche instead of the round (helmet-like) one.


If you want to get in the mood, just look at these gorgeous creations!!! Pretty, handmade, almost art I would say. Since I don't work with felt I must take a look at cloches that are sewn. My inspiration are these, because these hats have a pretty cloche-shape and are sewn from unshaped woven fabrics.
I took one hat for further analyze: this one, because of the plain color and pretty shape. The structure is consisting of 3 parts: top, side, brim just like my winter hat.

Now, what are the (visible) differences in the structure?
Top: 
It is made up out of four triangles, but while my top is rather flat this one is more curved. This means I have to make my triangles bigger and more umbrella shaped. Also while my triangles match the seam-lines these are turned so they form an X rather than a + on top.
Side: 
I think the sides are quite similar, so no big changes to that for now. As I see it has only one seam-line, at the back.
Brim: 
The brim has the same width at the front and the sides and gets smaller towards the back. Again, just one seam-line at the back.

This was my first try: Too small, I added some extra fabric at the outer edges. This was quite easy.
It was harder to make the sides. I went with a two part design. I experimented with the shapes and ended with a slightly curved upper and lower part:
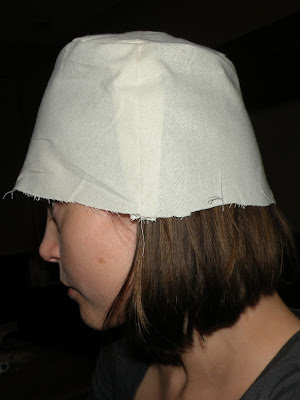

The top is visible here:


Number one attempt. It looked like some kind of rain-hat or fisherman hat. Hmmm...
  

Below is the 4th version with a wider top. (I haven photographed all the wasted, too small-too big versions, but let me tell you it took a lot of time to try on and adjust everything)
Here I thought the fit was right!  I only needed to shorten the sides:
 

On the first picture in the second row is clear that the new top is much wider than the first one (on the left):


And here is my finished design! Please ignore the notations written all over. I quickly made some embellishments just to make it look 'real':


There is still a lot left to do:
- mark all the seam-lines 
- take the muslin apart 
- trace all the pieces 
- add seam-allowances
- make another muslin from a thicker and sturdier fabric 
- check the fit again
To be continued!