Monday, February 6, 2012

Creating a cloche pattern - part 1.


Let's start with a statement:
It is pure for my own pleasure that I attempt to make my own patterns. I don't use any existing pattern to do this, gather only visual inspiration from the internet. I am not a pattern maker and I'm not intended to sell any of my patterns and earn money that way!

Well, here is my current obsession, the 1920's cloche hat.
Cloche inspiration: There are lots of beautiful cloche pictures on the internet. There are two sorts of hats called a cloche: the one with the close-fitting round crown with mostly no brim and the more cylindric 'brimmed felt' type cloche (like in the illustration below). Both are reminiscent for the 1920's. For a nice collection of fashion drawings  click here.

What I like is the close-to-the-face shape of these hats and the embellishments. You didn't show your forehead in the twenties! The height of the hat was supposed to add height to the wearer's length too. Cloches were perfect to wear with the new hairstyle, the bob haircut. The brooch type embellishments like flowers or abstract, often art-deco-like shapes were made of fabric are used to cover up seam-lines. For myself because of my round face I'd choose the cylindric cloche instead of the round (helmet-like) one.


If you want to get in the mood, just look at these gorgeous creations!!! Pretty, handmade, almost art I would say. Since I don't work with felt I must take a look at cloches that are sewn. My inspiration are these, because these hats have a pretty cloche-shape and are sewn from unshaped woven fabrics.
I took one hat for further analyze: this one, because of the plain color and pretty shape. The structure is consisting of 3 parts: top, side, brim just like my winter hat.

Now, what are the (visible) differences in the structure?
Top: 
It is made up out of four triangles, but while my top is rather flat this one is more curved. This means I have to make my triangles bigger and more umbrella shaped. Also while my triangles match the seam-lines these are turned so they form an X rather than a + on top.
Side: 
I think the sides are quite similar, so no big changes to that for now. As I see it has only one seam-line, at the back.
Brim: 
The brim has the same width at the front and the sides and gets smaller towards the back. Again, just one seam-line at the back.

This was my first try: Too small, I added some extra fabric at the outer edges. This was quite easy.
It was harder to make the sides. I went with a two part design. I experimented with the shapes and ended with a slightly curved upper and lower part:

The top is visible here:


Number one attempt. It looked like some kind of rain-hat or fisherman hat. Hmmm...
  

Below is the 4th version with a wider top. (I haven photographed all the wasted, too small-too big versions, but let me tell you it took a lot of time to try on and adjust everything)
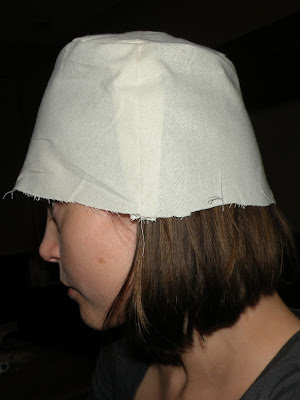
Here I thought the fit was right!  I only needed to shorten the sides:
 

On the first picture in the second row is clear that the new top is much wider than the first one (on the left):


And here is my finished design! Please ignore the notations written all over. I quickly made some embellishments just to make it look 'real':


There is still a lot left to do:
- mark all the seam-lines 
- take the muslin apart 
- trace all the pieces 
- add seam-allowances
- make another muslin from a thicker and sturdier fabric 
- check the fit again
To be continued!

Saturday, February 4, 2012

1920's fashion


Recently I've got this EvaDress pattern and I must admit I love the 20's style! Probably my second favorite fashion era after to the 40's! Look at the elegant, pretty dress and coat below:


 Loooove those cloche hats!
 
Angelina Jolie in the movie 'Changeling'


And this is my hat, bought in London. Banana Republic 'Patricia' hat. How about these beauties?

Thursday, February 2, 2012

Marfy patterns dress - muslin 2.


Here are the pictures of my perfected muslin. Looks very 1940's, doesn't it? And it looks exactly like the model drawing! The bodice is not super fitted, although this is not really clear when looking at the drawing.
For the pictures I've put on a small belt. So it is visible that the horizontal line between the bodice and the skirt part sits perfect on the waistline.
Here are the adjustments:

- Stitched down the pleats. The pleats look like the model drawing:


- Widened the upper part of the cuffs by 1 cm. The sleeve falls much better now:


- As for the back, I started with a swayback- adjustment.
There are different methods for this, I did the following:
Took out a horizontal piece, which I folded. This shortens the midline in the back and is tapered to nothing at the sides. The fit is better now. It is not totally fitted, since I want to wear the dress with a belt, so I need a bit of extra ease. You can observe a few vertical lines towards the sides, this is a sign that I have to take out a bit less fabric towards the sides:


And here is a before (left) after (right) comparison:
  

Now I need to transfer the changes to the paper pattern pieces. One thing that I need to do is to add the same amount of fabric at the bottom of the skirt as the amount I took out in the middle of the skirt back. On the right picture above is clear that the side seam moves towards the back! This needs to be corrected too.

Sunday, January 29, 2012

Marfy pattern dress - muslin 1.


Here is part 2. of the process of making a dress by using a Marfy pattern.
My muslin is a one sleeved version as usual, didn't use the two layers for the collar because I'm only interested in the global look. (The collar pieces are very neat though, the undercollar pieces are slightly smaller than the upper pieces. I guess you don't see this very often on commercial patterns.)

Gathers or pleats?
I still find amazing that my muslin looks exactly as the drawing! Well, they only had drawings during the first half of the 20th century, but now I have to get used to it again...
One thing that's hard to see and why I would like to have at least a line drawing are the small details. For example under the shoulder yoke patten piece the instruction says 'pleat'. Both in the front and the back. At the back there are vertical lines which shows where and how to pleat, but in the front there aren't any. The pattern pieces are not printed, but stamped with some instructions. They might forget one, right?
So what to do next? There are two options. Since there is no line drawing (usually, these provide the most information you need) we can search a clue either in the written model description or take close look at the drawing:
- the catalog description:
"This form-fitting, shirt-waist dress has a belted waistline and triple darts that open into the flared skirt. The short sleeves have gathers at cuffs and shoulders to impart some flow. It has a slightly offset collar and yoke at the shoulders. Suggested fabric: muslin, sateen, eyelet embroidery."
Does mention the yokes but nothing about the pleats...

- the model drawing:


So we know that on the back there are pleats. I can see the front is drawn in the same way. Another fact: the patten says 'pleat'. It would look kinda weird if there were pleats at the back and a gathered piece at the same place in the front of the same dress, right?
When I look at my inspirational pictures here I see gathering under the yoke on the Peckham dress and pleats on the 'picture-drawing'. Since the first one is made of very thin fabric I might go with the second solution and make pleats. Three of them, because that is what I see above.

The muslin:
The overall fit is good. The shoulder width and the sleeves fit perfect. There is enough ease in the dress, just a tad more I usually want. Though in the drawing the dress is worn with a belt and that is what I'm going to do too.

Notice that Marfy patterns use the following descriptions for the fit:
- tight-fitting: fitted garments with just a little ease
- form-fitting: these garments has a slightly loose fit, like this dress. They are somewhat fitted but you can easily move.
- loose-fitting: really loose fit

First I was afraid that size 42 (Marfy's smallest size) might be too small but it isn't.
Notice, this is not the same as the European size 42! (For reference: I always wear size small clothing or  European size 36 and in US patterns I usually end up with size 12)

- As you can see, when making the muslin I just followed the instructions on the pattern pieces and made pleats at the back yoke and gathered the front. (Of course, the skirt front and back are not made of two separate pieces, I just wanted to use less fabric since it is cut on the bias) In my opinion the pleats look better, because the sleeves are quite full, visually there is enough gathering there. And I think the collar looks beautiful!
  

- The sleeves ends above the elbow. The cuff of the sleeve is just a tad too tight at the upper part, hence the horizontal folds (left). If I pull it down it fits perfect (right):
  

- If you look at the back and side pictures you might notice that there is some bulking at the back. I have to do a sort of swayback adjustment there, on the skirt:
 

- Other thing I've noticed is that I've accidentally left the front pleats open while they must be closed. It is going to look better because the line of the darts will continue into the pleats:

As you can see, when you have no instructions at all it is really important to examine the drawing closely and to compare it to your muslin!

So what to do if you have a Marfy pattern but neither a description nor a drawing?
I can imagine that someone gets a pattern or inherit a pattern and has absolutely no clue of how the whole thing should look.
My advice would be to examine the pattern pieces (lay-out) and then to make a muslin. That way you can puzzle a bit with how everything goes together.

If you buy a Marfy pattern you need to do a couple of things:
1. Mark the pattern pieces after unfolding
Mark clearly all the pieces with the model number and size. Marfy doesn't do this for you!
2. Save the picture and description
In the catalog the drawings are quite large, twice the size of a regular pattern envelop, so some details are better to see. However, most of us don't have all the catalogs from the past seasons. When you see a pretty garment somewhere in the internet and want to order it try to save both the picture and the description immediately!
Look whether you can find a picture in an even better resolution or if there is no description (for example on the Marfy website) try to find one somewhere else (most resellers do include descriptions).
Make a print or a copy of the drawing and store it with the pattern pieces.
Have I mentioned that this dress is from the 2011/12 catalog? Right. Not the one I own... Though I'm thinking of buying it because there are a few pretty dresses there. Just look at the pictures in my first post about Marfy.
Remember, you can order every pattern as long as their stock lasts. So if you are lucky you can even buy patterns from Marfy catalogs from 3-4 years ago!

Saturday, January 28, 2012

How to work with Marfy patterns - part 1.


I thought it might be interesting to write down in detail how I am going to tackle the 'Marfy-challenge'! I wrote about the issues with the patterns of this Italian company here. Let's say, there are some challenges there. But: the pattern illustrations look just beautiful and I think I have enough experience in sewing to be able to figure out how a dress goes together.
So today I write about the start of the process:
- inspiration
- interpreting the illustrations
- adding seam allowances
- estimating the amount of fabric needed

Inspiration:
Let's start with the inspiration. Sometimes it is a special fabric, but it can be a certain silhouette of a garment as well. I pulled out one of my fav. inspirational pictures: the Jenny Packham S/S 2011 dress which Kate Middleton wore in yellow on the Canada tour. There is also an original forties dress drawing which I like. The features I really love are the shoulder yokes and gathers, the fitted bodice with the buttons and the flared skirt. I think this the kind of silhouette might be flattering on most body types.

 
right picture borrowed from glamourdaze.blogspot.com

The pattern illustrations:
I recently discovered the Marfy patterns. They have a lot of pretty, vintage style dresses. The pattern I choose is the Marfy 2440 dress pattern. It has pretty much every feature I want. (The neckline is different from the inspirational pictures, but I think the v-neck is flattering and can easily be adjusted if needed. I'm hoping to have a great basic pattern which I can use over and over again.)

The Marfy patterns does have a description (some of them more detailed than others), but no line drawings (sometimes not even a back view) so you have to rely on the drawing as reference. I still think it is kinda weird that they don't publishing pictures of the finished designs, though their website emphasizes that "each patten is tested, studied and perfected on fabric". I would even be happy with colorless muslins on a real body... Still, while browsing on sewing blogs I noticed that the bloggers finished pieces look exactly like the catalog drawings.
Well, if you look at the drawing the model seems to be tall, blessed with endless legs and a tiny head (both are everything but me). I put a picture next to the drawing for comparison:


If you take a look at the illustration next to my dress you see that the skirt should be shorter. Although it is not clear how long it exactly is. Proportional: it seems longer than mine, though both the illustration  and my blue dress fall just on the knees, exactly the same length as the Peckham dress. The only way to know it for sure is by measuring the pattern pieces.
After checking the measurements which are of course (again) between two sizes I decided to order the smaller size. I prefer fitted dresses anyway, so figured it would be better to start with a smaller size to adjust. Since I always make a muslin so making adjustments can't really be an issue.

EDIT: If you are handy with Photoshop you can play with different designs on your own frame like hereOf course, you also can use paper and pencils to recreate a design. It can be especially handy when working with vintage patterns or when you have a different body shape than the models on the pattern envelopes. (Who doesn't?...)

Lay-out of the pattern:
For me, the pattern pieces go together in a logical way. The facing for the front and the undercollar pieces are included too. There are markings at the sleeves - a few letters at the joining points, but overall I find mostly notches. Here are the pieces spread out on the floor:


Seam allowances and tracing:
Since I discovered how easy it is to sew with patterns with seam allowances included I simply add the seam allowances when I trace other European patterns (like Burdastyle, Burda magazine, Knipmode magazine). Though it takes some extra time and tracing is not my favorite part of the whole sewing process I think it is definitely worth it! At the end of the day it works so much easier for me. Back in my teenage days I just used to cut up fabric with different seamallowances all the way. Then puzzeld with matching the contour lines of the pattern pieces and it took me so much more time! When you use patterns with seam allowances included you can go on with sewing without worrying about mistakes. The moment you have to be precise is when you are cutting your fashion fabric. Concerning tracing the patterns: I believe that tracing saves your pricey originals and allows you to use them over and over again.

EDIT: Everyone who has followed the 'bombshell course' on Craftsy has seen that Gertie marked the seamlines by stitching along the lines first and then assembled the pieces by matching those lines. For me that's a kind of couture solution and certainly can come handy when working with small pieces. But usually I don't have that much of time when sewing so when I work with European patterns I just simply add the seam allowances after tracing. For me it works much quicker when stitching the pieces together. (I just use a plastic card or sometimes even a firmer paper card on which I mark the 1,5cm (5/8") width. Then I go along the pattern lines and mark them every 5/8" or so before cutting.

How to estimate the amount of fabric:
Since Marfy patterns don't have a lot of instructions you kinda have to figure it all out by yourself. There is an approximate measurement of the fabric yardage you need, but that might be less or more.
For example, somehow I have the habit of cutting single layers. I like to puzzle with the pattern pieces on the fabric... That way I can cut more precisely and use less fabric too.
My advise would be either to take the pattern pieces to the fabric store and try out the layout on the fabric itself (considering the seam allowances, of course) Another idea is to take fabric from your stash with the same width and try to figure out the layout at home. (this is what I'm going to do) It is important to examine the grainlines indicated on the pattern pieces, for example the skirt pieces of this dress must be cut on the bias, so generally requires more fabric.
In the meantime I received my 2012/13 catalog. At first I thought there were just a few interesting designs, but looking closely there are a lot of pretty patterns there! Everything looks very tailored and the designs have a lot of interesting details.

Tuesday, January 24, 2012

Bare pattern


My Marfy pattern has arrived.
Well, how bare can a pattern be? 11 pieces, some notches and spare instructions. There is not even a line drawing included. You really need the catalog (mine hasn't arrived yet) or a print from the online model drawing to get started...


Friday, January 20, 2012


I received the EvaDress patterns today! (The other patterns are still on their way to me...)
This blouse has some really great details:
- the asymmetrical closure
- the darts/tucks at the sleeves
- pretty lines which looks even better with stripes - just look at the pattern envelope!
- the sleeves are raglan cut at the front but there is a one piece kimono sleeve at the back. Interesting...

It is a single size pattern, size 20. If I check the measurements I think it is just a size too big for me. According to the measurements given for size 18 that would be just spot on. However, vintage patterns tend to have less ease than modern patterns, so you guess, I must make a muslin...
Probably need to grade the pattern down. But first start by measuring the pattern pieces.
The coat pattern is size 18 which should fit perfectly, though it is a totally different fashion era, made 20 years before the blouse pattern. So exciting!

Another pretty blouse pattern is this one (I guess I need to buy this one too!) And how about this one?