Showing posts with label BabyBootie. Show all posts

Monday, December 16, 2013

Free vintage baby bootie & bonnet pattern from 1965


Okay, I'd take a short break, but then I remembered that I've already prepared this post a while ago, with items that could be made for the holiday season. They could make a great Christmas gift! It seems that free baby-knitting patterns remain popular on the internet. These small projects are quick to make, you can use your left-over wool and finish them just in a few evenings. I've already done a post on testing 3 free available baby bootee patterns from the internet here. Today I have another baby bootee and bonnet pattern from 1965, with a definite vintage air! Cute, isn't it?
 

These booties have shaped toes and heels. The original pattern uses the classic white/pink (pr white/light blue) combination. Unfortunately there is no contrast visible on the original, black-and-white picture below, it seems all white.
Actually the moss-stitch parts are knitted in the contrasting color (pattern instructions: pink) and the 'bobbles' are white. I think a bolder, modern color combination like bright blue and yellow or grey and yellow, grey and bright blue or pale green with pink could work just as great! Below details of the construction (made up a bootie) and a detailed explanation of how to knit the two-colored bobble-pattern! You find the original patterns at the end of this post.

stitches & patterns used


moss-stitch:
The edges and the sole of the booties are knit in Moss stitch (also referred as 'M-st.' in the instructions). Moss stitch is simply altering knit and purl stitches followed in the next row by purl above knit stitches and knit above the purl stitches:


two-colored bobble-pattern:
The main pattern is knitted in two colors. There are 'bobbles' in the main color (here white) and in between stripes in the contrasting color (here gray):


pattern chart:

One pattern unit is 6 rows tall and 3+1 sts wide.


bobble-pattern step-by-step:
1. the pattern starts with 4 rows in stocking stitch (knit on the right side and purl on the wrong side)


2. start the next row in the contrasting color. The pattern is formed by 3 knit stitches followed by a 'drop-stitch':
   

3. drop the stitch until the colored stitch and pick that one up (you will have 4 strands of wool above that stitch)
   

4. put your needle under the 4 strands, pick up the wool and pull it through as if to knit (now you have the new loop on your right needle and the original stitch next to that)
   

5 now pass the original stitch over the loop you just made: pick up the original stitch with your left needle and lift it over the loop
   

Your finished stitch (left) the wrong side of the work (right):
   

material and sizing:

  • The yarn specified in the instructions (see below bonnet pattern) is a fingering weight yarn, with no.10 needles (metric 3,25) and 7 sts per inch. My guess is, the finished items should definitely fit a 0-4 month old baby.
  • I used for my sample a slightly heavier, sport/baby weight yarn with metric size 3 needles. My gauge: 6 sts per in. My finished size from heel to toe: 9 cm (3,5 in). According to baby boot charts this should fit a 3-6 months old baby.

bootie-pattern:
   

These booties are knitted top down. First step is to knit the straight, patterned part above the ankle. After making a row of holes for the tie you separate the stitches in 3 sections. You continue working on middle section for the instep. The turn is made by picking up stitches at the sides, just like when knitting a sock. You finish after decreasing in an angle for the toes. The bootees have a seam along the length of the sole up to the back. As always, I suggest using a flat seam finish to avoid bulky seams inside. (See link under tab 'knitting hints')


my pattern modifications:
- instead of 'make one' (m1) by picking up a strand from the previous row I used 'yarn over' to make the holes around the ankle for the tie. A yarn over makes larger holes which are easier in use imo:

Warning: I'd strongly recommend to use a crochet chain or other elastic material instead of a ribbon for safety reasons. Though they look pretty, ribbons are not elastic. When pulled too hard they can be potentially dangerous!


bonnet pattern:
To make up: join back seam from fastening off to first decrease. Sew on ribbon.

Courtesy & source of all newspaper images: AWW through Trove.

Friday, June 14, 2013

Quick little projects: baby bootie knitting patterns


The ultimate baby shower gift are self-made baby booties. They are original, quick and easy to make. we often don't realize, but for those who can't knit or crochet it seem to be a little wonder if you are able make one of these.
There are a tons of baby bootie patterns out on the internet. Of course, you can buy them but there are enough free patterns as well, and it is easy to customize them so why would you pay? Just browse the internet for more inspiration!
I've chosen three free patterns from the internet to show here. Scroll down for links to the patterns.
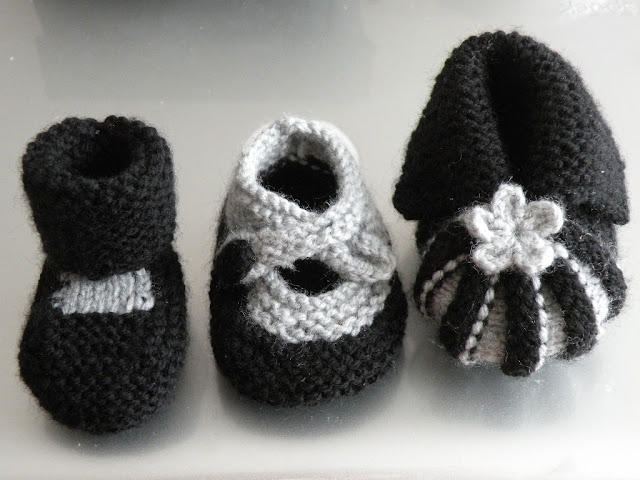
Above from left to right: The Bernat baby's booties, Saartje's booties and a Vintage ribbed baby bootie pattern. I used the same leftover yarn (hence the 'not so baby-ish' black and grey colors) for all three of them.

All of these three patterns are available in different sizes but imo trying another gauge could be enough to adjust the sizing. Apparently, most newborns and baby's look adorable with these mini-booties during the first months and later on as they grow they are just busy trying to kick them off. So you can certainly come far enough with the smallest stitch count and a different gauge. Here are my notions on these patterns:

  • Yarn for the samples: 'baby acrylic'-type (fingering weight or 3-ply)
  • Gauge: about 7 st per inch (28 st per 10 cm)
  • Needles: I used European metric size 2.5 (US size 1).

1. Bernat baby's booties


When reading reviews on the internet a lot of people mention that these booties stay on very well and don't slip off from the little feet! Making the smallest size these booties came out really tiny, probably perfectly sized for a newborn baby.
When knitting you start at the bottom, shape the toe-part by increasing and decreasing the amount of stitches and then continue to make some length for the rolled over part. The booties are open at the back during the process. You stitch the sole and the back at the end. The pattern uses garter stitch with a small part of stockinette (grey). This makes it really easy to knit.

Finished size:
Tiny! Sole from heel to toe: 6 cm

My tips:
- It is not mentioned but very important is to catch off really loosely, otherwise the booties are impossible to put on and can even be dangerous if too tight!
- Be careful when stitching the sole and back and avoid thick sewing lines! There are quite a few pics on the internet that show thick ridges along the stitching lines which can't be comfortable for tiny feet! Be sure you just pick up the very edge when stitching.


How to customize:
- use 1K 1P instead of the garter stitch
- use stockinette stitch for a rolled down edge instead of a folded edge
- sewing buttons at the outer sides of the fold over part
- fold over part in a different color
- crocheting an edge in a contrasting color
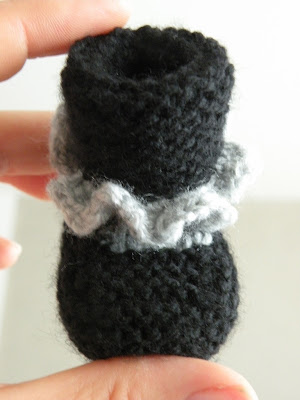
- crocheting ruches along the fold over edge: I did this by putting two single crochet stitches in every stitch of the finished edge and then adding a second row putting two single crochet stitches in every stitch of the first row:


2. Saartje's booties    

This pattern uses two colors which already makes the little booties pretty. Again a pattern that uses the similar shaping method as the Bernat booties. you start out at the bottom and continue to shape the toe-box. Pick up the second color and after a few rows you pick up new stitches to make the straps. The pattern uses garter stitch what makes knitting quick and easy. At the end of the process you'll be left with quite a few pieces of thread. I didn't find this a problem, it is a matter of carefully weaving in the thread along the stitches. (I have just one button for my sample, but of course there should be two of them there!)

Finished size:
Sole from heel to toe 7,5 cm

My tips:
- Be careful when stitching the sole and back and don't make thick sewing lines! There are quite a few pics on the internet that show thick ridges along the stitching lines which can't be comfortable for tiny feet! Be sure you just pick up the very edge when stitching.
- Again, catch off quite loosely to avoid tight sitting straps around the feet.


How to customize:
- use contrasting color buttons
- use buttons with a motif
- make one strap across instead of two crossing straps
- make loops instead of straps and pull a twisted thread through to tie

3. Vintage ribbed baby booties pattern


There are a lot of different versions of this pattern available.The amount of the ridged edges can be different as well. A lot of them free, so I would certainly advise not to buy it!  The original pattern seems to be one from the 50's.
As opposed to the other booties which you knit from bottom to top this pattern has a different approach. You are knitting from side to side and then gather the top and bottom of the ridged edges together as a finishing touch. According to the description you could put a loose ribbon under the folded edge for a vintage look but you can crochet a chain as well or make a twisted thread (my grandma used twisted thread ties in knitted pieces all the time!)

My tips:
- I made the first bootie by following the pattern and making 9 ridges with 10 rows of stockinette (grey) in between. Then the toe box seemed so roomy that I decided to remove a few rows and ended with 5 ridges and 6 rows of stockinette in between. Imo further increasing the amount of ridges would make the front of the bootie too wide and the bootie length too short.
- Be careful when assembling the bootie and pulling the ridges together not to make it too thick.
- The pattern I used didn't say anything about shaping the heels but I would certainly advise to make the heels a bit rounded by pulling a few rows lightly together. I can also imagine adding a little shaping when knitting by decreasig/increasing the edge in about 12 rows in the middle.

Finished size:
Sole from heel to toe 7,5 cm


How to customize:
- instead of using one solid color knit the inverted (stockinette) ridges in a contrasting color
- make a tiny crochet flower to cover the seam at the top
- use a button instead a flower for baby boys (and girls)
- crochet little stuffed balls/flowers or strawberries for the ends of the ties
- make little pom-pom ties

To crochet the little flower I used:
- Chain 4 and form with a slipstitch a ring.
- Petal: *chain 3, 2 double crochet into ring, chain 3, slipstitch into ring*
repeat 4 more times for a five-petal flower.

Last but not least, here are the links to these free patterns 
(click on the name below to go to the pattern source)
1. Bernat baby's booties
2. Saartje's booties
3. Vintage ribbed baby booties