Thursday, December 12, 2013

Top Honours jumper reveal!

edit: 
I finally managed to take proper pic of my finished jumper.
You can find them HERE.
total amount of yarn used: 290g (little less than 6 skeins of drops baby merino)


Hi everyone, a really quick and short post before the upcoming busy days, of moving in our new home.
I still have to make proper pics of my finished jumper, but don't have the time to do that these days. Here are two quick snapshots of my new favorite jumper which I've already worn one time, combined with a black skirt, thighs and pumps. As you see I didn't use any vintage styling.
The fit of the jumper is just as great as I expected and the finished texture is smooth and elastic like a good quality double knit fabric would be. The drops baby merino is definitely my favorite yarn to knit with!
Coming up: more pics and the pattern modifications I made, of course.

Almost moving!


After almost 1.5 years of remodeling and rebuilding of our, 1950's house we are finally ready to move in! Can you believe it?! Of course, we still have a list of things to do, but the important projects like the kitchen, bathroom, the downstairs toilet, the hallway and breaking down a wall are finished. Most of the furniture will be transported on sunday, but we are going to sleep there for the first time on saturday. (moving our bed and the cat the day before 'moving day' seems to be a good idea to reduce stress for our cat)
Of course, this means a short leave from blogging - just a week will be enough, I guess.

In the meantime I've already worn my Top Honours jumper once! This happened before sewing the press studs on, so I had to close the neck opening while wearing the jumper. Well, as you can imagine, it wasn't easy (imagine trying to sew something in front of a mirror) but I really wanted to wear it and it was definitely worth the effort! Unfortunately I only managed to take two snapshots which I'm going to post tomorrow. Of course, I'm planning to take better pics and the pattern will follow soon.
I have a small Christmas-crochet-project I want to start and finish next week, while already working on my next knitting project.

Below a better picture of the Roman blinds which are now installed in the bay-window. I'm happy with it!


Tuesday, December 10, 2013

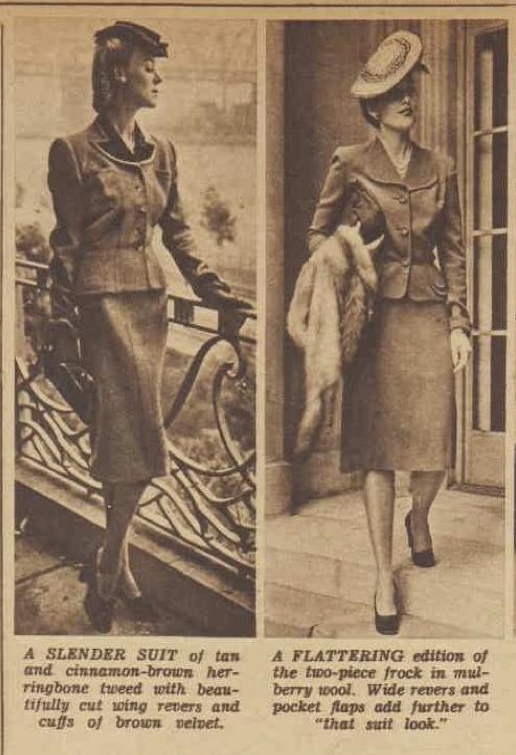
Slender silhouettes - 1944 article


How pretty are these wartime suits?!
Comparing these to the famous Dior New Look suits with the tiny waists and huge skirts, I'd say these mid-40's suits are more elegant and definitely would look much more flattering on every body type. Beautiful!
Typical details for the era are the short fitted jackets with accentuated shoulders, high neckline with different type of revers (lapels) and only 3 buttons on the jackets, slightly A-line skirts without gathering or pleating due to the wartime restriction rules (read about it more here), with complementing accessories: hats, bags and gloves.


Friday, December 6, 2013

another corner finished


Looks like this piece of furniture was made for here!
It belonged to my BF's grandmother, who passed recently. Unfortunately no idea how old this little cabinet is or where it came from. The top and the back is marble. I might sand it one day, to freshen up the darkened color of the wood.

Thursday, December 5, 2013

Sewing tip: the grainline of skirts affects the flare!


Having a couple of nightshifts right now, these are the days when I tend to focus on sleeping, working (and a bit of reading or knitting) instead of being active doing other things. The darkness outside doesn't help either. In the morning there is still dark when I bike home and when I wake up in the afternoon there is usually getting darker. Anyway, I decided to reveal the Vogue skirt and my Top Honours jumper (when finished) together. In the meantime I have an interesting sewing trick for you:

While I wasn't making a circle skirt I've found interesting information while browsing through my fav. pattern-making book: 'Pattern making for fashion designs'.
did you know... 
..that grainline matters when sewing a (circle) skirt?
The following information + the illustration below are borrowed from the book 'Pattern making for fashion designs. The line-drawing below is made by me, based on an illustration in the book:
Flares tend to fall gracefully whenever the grainline is on the bias. Changing the grainline can control where the bias and the flare fall.

  • grainline 1: 
flares fall toward the side and side front - straight grainline
  • grainline 2:  
flares fall to center front and toward center side seam - placed between front and side seam
  • grainline 3:  
flares fall at center, side seam and in between placed 3/4 inch from center


You can see the grainline-difference not only on circle skirts but on other flared skirts as well. An example of grainline 2 is my Lonsdale dress where the flares are distributed quite evenly and of grainline 3 the Ceylon dress, where there is more flaring towards the sides:
   

Tuesday, December 3, 2013

Top Honours jumper: 4. Neckline tricks


Finishing the neckline is almost always the last step in the knitting process. While the neckline of the Phillipa jumper is finished with a crochet edge the Top Honours jumper has a classic rib finish. While it seems easy there are a number of tricks that makes your neckline look prettier. Because I wanted the grey color closest to my face I used that for the neck band (the waist and sleeve ribbings are blue)

1. picking up stitches
Usually the pattern instructions tell you how many stitches you need to pick up along the neckline. Then you should divide both the numbers as the neckline in even amounts, place stitchmarkers and pick up the amount of stitches  distributed evenly between your markers. So what's wrong with that? Basically nothing, but in my opinion it is almost impossible, plus time-consuming to distribute the stitches evenly.
I prefer another method, which is picking up more stitches and reducing the amount in the first round. This way you don't end up with gaping holes and you get a prettier, smoother curve. I picked up every stitch evenly and corrected the amount in the first row by knitting (or purling according to pattern) together every 4th and 5th stitch. This methoprevents a stretched-out look too.

As you can see there were quite a few stitches!

Try to keep the same distance all around, also on the diagonal sides:


To prevent a really high closing neckline I reduced the width of the ribbing.

2. casting off
It is important to cast off very loosely! (=a trial & error experience)
Even when you don't need to stretch the neckline out to pull it over your head, tightly cast off stitches can deform the shape of the finished neckline.


3. how-to: finish with a button loop
I choose a decorative button to finish the ribbed edge and used press studs for the opening (trying not to disturb the pattern). Attach the button at the inner edge of your button band underlayment. A small silver colored rose looks great on the blue- and grey tones:
   

I finished castig off the ribbing at the side where I wanted to have the button loop. The ribbing pulls a bit inwards (left pic) so I filled that up with a row of double crochet (right):
   

Secure the last stitch with a slipstitch to make a neat and straight edge:
   

Make a chain loop for your button:
   

check that your loop is not too tight and not too loose before finishing the loop:
   

Previous posts about the making of this jumper: 
1. introduction 
2. pattern chart and pattern diagram 
3. sleeve caps + my modification: back neck opening